Configure IMAP Email
Applies to:
Difficulty Level:
Low
Time Needed:
Depends
Tools Needed:
Premium IMAP email account (and password)
Introduction to Premium IMAP Email
Bower Web Solutions offers supported Premium IMAP Email which allows secure backed up email accounts of up to 25 gigs and syncing across multiple devices such as computer and smartphones.
For additional cost, Premium IMAP email PLUS offers secure syncing of contacts and calendars and 30 gigs of cloud storage with online editing capacity for storing and sharing documents.
This tutorial is designed to cover the basics of working with Premium IMAP Email.
While we try our best to assist our customers, assistance with third-party software can not be supported completely by Bower Web Solutions. If you have further questions about configuring your specific email application, please visit the company’s website.
We’ve also included guidance on setting and support such as spam filtering and auto responders.
First – Webmail
Once your account is configured and whenever you have a problem use Webmail.
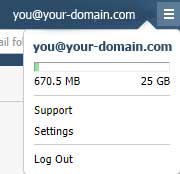
Simply go to webmail.emailsrvr.com and type in your full email account and password. By clicking on your email address in the top right corner you can access settings including changing your name and password (but be sure to use a secure password).
If you are ever having trouble with your email client you can use web access to confirm that the email account itself is working fine. (If you can’t login to web access there’s something wrong with your email name, password or the account itself).
Setting up Premium IMAP Email setup on your computer
If you are moving your email to a new server, i.e. you are already using the email ‘you@yourdomain.com’, most email clients (like newer versions of Outlook or Mac Mail) won’t let you have two accounts with the same email address.
So before you delete the old account connected to the old server (so you can add the new one) you’ll want to back up your emails first.
Once you’ve backed up and deleted the old account or if it’s a new account – you should be able to just add account.
This way if you have to delete the old account with the same name you’ll have a backup copy of the emails if needed.
Outlook on Windows:
File (top left)> account settings in newer versions of Outlook. Add account choosing Imap. The system should detect the account settings.
Outlook on Mac:
Click on Outlook in the menubar, the bar at the top of your Mac’s screen.
Choose preferences>accounts>click on the + in the bottom left of the window. Enter your email. Choose Imap as your provider. Add your email under DOMAIN\username or email and your password under password. You should get a pop up ‘Outlook was redirected…’ Check ‘always use my response for this server ‘and click ‘allow ‘ and then ‘done’. Close out of preferences and you account should be working.
Mac Mail
Choose the Mail in the menubar, the bar at the top of your Mac’s screen. Click on Accounts > Imap. Add your email and password and click next. Allow autodiscover to connect to your domain forever and serverdata to connect forever.
If Auto setup doesn’t work:
Login with your email and password at help.emailsrvr.com. and follow the IMAP tutorials for your email client. We recommend IMAP because of IMAP’s ability to sync email, contacts, calendar and task across multiple devices.
Outlook users checking multiple email accounts. Rather than creating a new profile as the help.emailsrvr.com tutorials recommend, you’ll want to add an account directly from Outlook. In most versions of Outlook this is done under the top file tab >account settings>add account. Manual setup will be the same as you’d see tutorial profile helper.
Depending on configurations, you may or may not be able to add the new account if another account already exists with the same email (For example, if you had a pop account on our server that you are changing to a premium IMAP).
But since you’ve backed the old email account up, you can safely delete the account and then add the data file back in later. Done properly, you’ll be able to add the data file back in and access your old emails. You’ll even be able to move emails in reasonable amounts to the new IMAP email account and they should sync across all connected devices.
Setting up Premium IMAP Email on a phone or tablet
Again, login (with your email and password) at help.emailsrvr.com or click on the support link under the menu in webmail at top right and follow the tutorials for your device.
Settings and Support for Premium IMAP
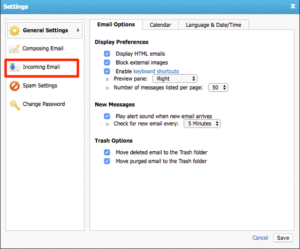
Settings for Premium IMAP are accessed from webmail via the hamburger menu icon at top right and then clicking Settings.
Support articles and tutorials are accessed from emailhelp.rackspace.com or by clicking on the support link under the menu at top right in webmail.
Spam Filtering
Premium IMAP email includes robust spam filtering which can be tweaked within webmail.emailsrvr.com.
Blacklist (blocked) and whitelist (safe) emails or domains can be added manually. I.e. spam.com would block everything from spam.com. You can use this example for blocking both the domain and subdomains: @%spam.com. You can also use the ‘%’ wildcard symbol to block specific IP ranges in the last 3 octets of the IP.
Within webmail, right clicking and marking an email as spam will allow the system to use AI to learn what you think spam is.
Bower Web Solutions recommends you disable your email client’s spam filtering (such as Outlook’s junk mail settings) as Premium IMAP email’s filters are quite good and looking for spam in multiple places (or not) can cause confusion or lost emails. Spam filtering allows you to block or allow senders and tweak other settings.
 Auto Responders and Forwarding and on Premium IMAP
Logged into webmail, in the Settings, pop-up box left navigation menu, click Incoming Email. You will then have access to auto-reply and forwarding. If you need additional help, please see the support tutorials by logging in with your email and password at help.emailsrvr.com.
And a word about folders
Outlook, webmail and phones all can create their own sent and trash or deleted folders. Unfortunately, sometimes you get multiple folders for the same thing with different email clients.
Older versions of Outlook and I-devices allow you to choose or map folders. Most other devices don’t. This can be confusing, especially when searching for a sent message. Be sure to check in all ‘sent’ folders or search by email address.
IMAP email storage
IMAP mailboxes are limited to 25 Gigs of storage space. If your account fills up you can either delete a lot of emails or move them into a seperate data file, called a pst in Outlook, and move emails into this file.
Here’s how to create a pst in outlook.
If you let your account fill up you will not receive any more emails. Senders should receive a message notifying them that the account is full, but these messages often get marked as spam or missed.

