Configure Email on iPhone, iPod Touch and iPad
Applies to:
Difficulty Level:
Medium
Time Needed:
15 minutes
Tools Needed:
Apple iPhone, iPod Touch or iPad with an internet connection
Introduction
The following tutorial is provided as a courtesy to our hosting customers to help you configure email on Apple iPhone, iPod Touch and iPad to work with Bower Web Solutions hosting.
While we try our best to assist our customers, assistance with third-party software can not be supported completely by Bower Web Solutions.
Most cellular providers include email set up assistance as part of the contract. You may find it easier to have them set up the your phone. In addition to the email username and password, please let them know that auto-discover will not work properly with our servers.
Since cellular phone techs should be familiar with how to add settings here’s the basic set-up information.
Devices need to be setup manually as a POP account with the following settings:
- Incoming and outgoing servers should be server3.bowerwebsolutions.com.
- Outgoing: SMTP SSL: on (using Port 587). Password is required.
- Deleted Messages change Remove to immediately.
- Incoming: SSL: on, Authentication: Password , Server Port : 995 .
- Change the drop menu under “Remove ”(from server) to “After one day” or “After one week”.
Requirements
Before you start, be sure you have these pieces of information available:
- Your email address ( example: someone@somewhere.com )
- Your email password (NOTE: passwords are case-sensitive and must be entered exactly as provided)
How to Set up Your Apple iPhone, iPod Touch and iPad to work with Your Bower Web Solutions Email Account
Before starting, to avoid errors while setting up Mail on your iPhone, iPod or iPad, make sure that you are connected to the Internet. If you cannot be connected to the Internet, you may still set up Mail, but additional steps will be required.
This tutorial will guide you on how to setup POP email account from iPad. The steps are similar for the Apple iPhone and Apple iPod Touch although the screen shots pictured below may vary slightly between the different devices.
-
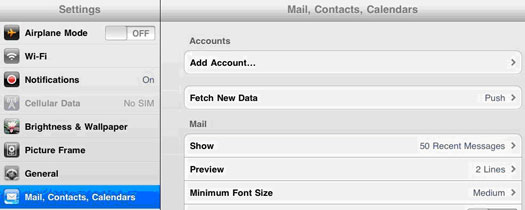
- If this is the first account you’re setting up on the iPad tap Mail. Otherwise, from the Home screen tap Settings -> Mail, Contacts, Calendars -> Accounts -> Add Account.

- Choose your email account type: Tap Other.
- In this Other screen, Go to Mail -> Add Mail Account.
- Enter your Name (First and Last), Address (full email address), Password (remember to enter the EXACT password, paying attention to case) and a description for yourself. Then tap Next.
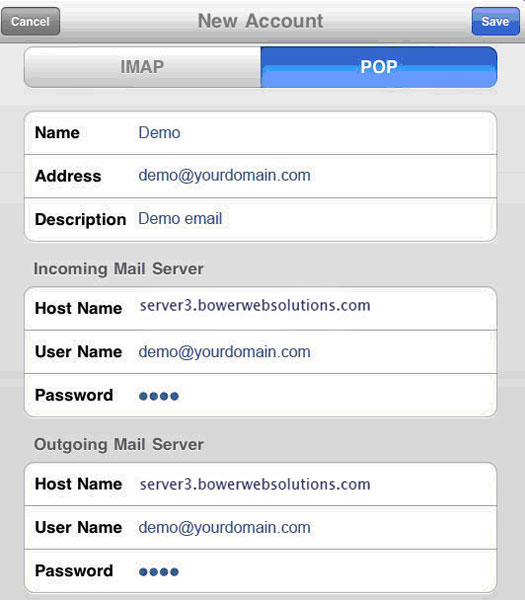
- On the next screen IMAP and POP will be show on top on bar. Tap POP.
- Fill in all as below POP info (if it is not already prepopulated for you) Name : Email name, Address (full email address), and Description.Incoming Mail Server :
Host Name: server3.bowerwebsolutions.com
Username: (your full email address)
Password: (your email password)
- If this is the first account you’re setting up on the iPad tap Mail. Otherwise, from the Home screen tap Settings -> Mail, Contacts, Calendars -> Accounts -> Add Account.
Outgoing Mail Server:
Host Name: server3.bowerwebsolutions.com
Username: (your full email address)
Password: (your email password)

- NOTE: Even though the screen may say the Username and Password for the Outgoing Mail Server is optional, you MUST fill out these fields as indicated above in order so the account to work.then tap Save. The device will then start Verifying your account as indicated on your device.NOTE: Your device may take a full minute or longer to complete its Verification process. Please be patient.
- After accept, go back HOME go to -> Settings -> Mail, Contacts, Calendars -> Tap (email account you setup earlier) and check POP and SMTP (outgoing mail server) setting.
- Tap server3.bowerwebsolutions.com On.
STMP SSL: on (using Port 587) for SMTP. Once confirmed, tap DONE. - Go back to email setting page , click advance to check your POP settings:
Under Deleted Messages change Remove to immediately.
SSL: on, Authentication: Password , Server Port : 995. Change the drop menu under “Remove ” to “After one day” or “After one week” to give the other internet device you use a chance to download messages from the server.

