How To Send Large Files Online
Applies to:
Difficulty Level:
Low
Time Needed:
5 minutes
Tools Needed:
Internet connection
Introduction
The following tutorial is provided as a courtesy to our customers to help them send and receive large files
While we try our best to assist our customers, assistance with third-party software can not be supported completely by Bower Web Solutions.
Email accounts on Bower Web Solutions’ servers can send and receive up to 50 megabytes. Other email can send and receive as little as 10 megs. Most hosts will send back a rejection message if they won’t accept a file that is too large, but not all do. Therefore sending large emails without verifying they got thru is not a good idea.
For collaborating as well as file sharing we recommend and use dropBox. Up to 2.5 Gigs (that’s 2500 megabytes or about 100 times what you can share via email) can be shared via a new free dropBox account. Once both parties have an account, folders can be shared so that both can add, remove or change files. With the free app you can work like they are in another drive on your computer or device.
Files (up to 2 gigs right now) can be sent via weTransfer though they limit the number of free recipients and time available for download.
To send multiple files it is best to organize them first on your computer into files and then zip them up.
How to create a ZIP File in Windows (ME/XP/2003/Vista/7)
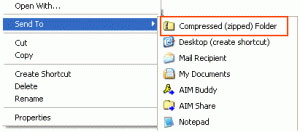
- Right click on a file, folder, or selection of files and click on the Send To menu option and then choose Compressed (zipped) Folder.
 The image at right shows the location of these menu items:
 - After selecting the Compressed (zipped) Folder menu option, the files will be zipped and you should now see a file that ends with .ZIP. The files name will be the name of the folder or file you compressed. If you compressed a selection of files, it will be the name of the first file in that selection.
- To extract a zip file, double click on it and it will open up. You can then copy the file(s) inside the zip that you want to use and paste them somewhere in your computer for future use.
How to create ZIP File using Mac OS X
- Either
Control key+click on the file and choose “Create Archive”
Or - you can click on a file, then go to the Action menu (the button that looks like a gear up in the Finder window’s toolbar), and choose “Create Archive” from there.Either process will create a new file, with the file extension “.zip” This is the compressed file. You can also compress several different files into one single archive file — just Command key+click (or Shift key+click contiguous files) on all the files you want included, then choose “Create Archive of _ Items” from the Action menu. A file will be created named “Archive.zip”.

