Configure Your Email Securely
Applies to:
Difficulty Level:
Low
Time Needed:
5 minutes
Tools Needed:
Email client previously configured to receive mail from Bower Web Solution’s server.
Introduction
In order to make our servers and your email more secure, on November 11th at 11:30 pm EST we implemented measures requiring that all email be accessed via a secure and encrypted connection. For most users this is just a minor change within your email client.
If you are having difficulty accessing your email via your normal email client you can use webmail. More details on webmail.
Do not repeatedly try accessing email. If you try too many times you will get your Internet connection blocked from our server.
Requirements
This tutorial is applicable if your email client is already setup and working. If you are setting up email for the first time on a device please see our complete setup tutorials.
IT Professionals and Expert Set Up
If you are familiar with the setup process you will need to confirm that the settings below are in place.
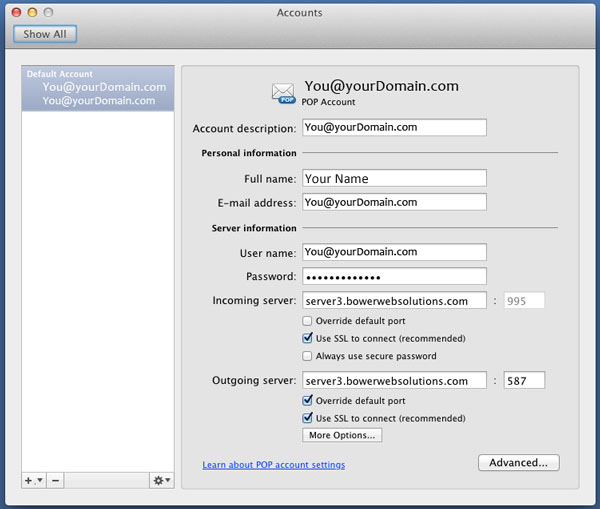
- server3.bowerwebsolutions.com for both incoming and outgoing servers.
- Incoming server should be 995 with an encrypted connection required.
- Outgoing server should be 587 with TLS encryption.
For detailed step by step instructions follow the complete set up instructions below:
How to Configure Secure Email Access in:
- Microsoft Outlook or Outlook Express.
- Windows Live Mail
- Apple Mac Mail
- Android
- iPhone, iPod Touch and iPad
- Web Based Email On Your Domain Using Gmail
- Outlook on the Mac
Microsoft Outlook or Outlook Express
 Open Microsoft Outlook or Outlook Express.
- Outlook 2010 and later. Choose File in the top left corner. Click on the ‘Account settings’ box in the center and then click on the ‘Account Settings: Add or remove accounts or change existing accounts’ box that appears.
- In some versions you need to click directly on the little triangle shaped arrow below ‘Account Settings’. In others you need to click on the ‘Account Settings’ box that appears below the first account setting box.
- Outlook Express and Outlook 2007 and older . Mouse over Tools in the main navigation bar and click on accounts.
- Outlook 2010 and later. Choose File in the top left corner. Click on the ‘Account settings’ box in the center and then click on the ‘Account Settings: Add or remove accounts or change existing accounts’ box that appears.
- When you finally get to a pop up box with 1 or more email accounts listed, double click on the email account you want to edit.
- Incoming mail server and outgoing mail server should be server3.bowerwebsolutions.com.
- But you are not done. Click “More Settings”.
- Click on the ‘Advanced’ tab.
Check “This server requires an encrypted connection (SSL)”.
The incoming server should change to 995 (change it if it does not!)
Check that the outgoing server (SMTP) is 587 and type of Encryption is ‘TLS’. If TLS is not available (Outlook Express and old versions of Outlook) choose the closest option to ‘This server requires an encrypted connection (SSL)’. - Click the OK button>Click the Next button>Click the Finish button. For Outlook Express click on the Apply button and save.
How to Configure Windows Live Mail
 Open Windows Live Mail (Normally under the Windows Live program folder).
- Mouse over Tools in the main navigation bar and click on accounts.
- Click on the account you want to check/edit and click properties.
- On the servers tab both incoming and outgoing server should be server3.bowerwebsolutions.com.
- On the ‘Advanced’ tab.
Check that the outgoing server (SMTP) is 587 and below Outgoing
Check “This server requires an encrypted connection (SSL).”
Check that the incoming server (POP3) is 995 (change if it does not!)
Below Incoming check “This server requires an encrypted connection (SSL).”>Apply and close out by clicking the Apply button then the OK button then the close button.
How to Configure Mac Mail (Mac OS 10.10 Yosemite)
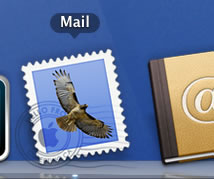
- Open Mac Mail. In the Dock, click on the Mail icon (the icon that looks like a postage stamp).
- Click on the Mail menu at the top left of your screen and select Preferences.
- Click on the Accounts icon at the top of the window.
- Click on the account you want to edit.
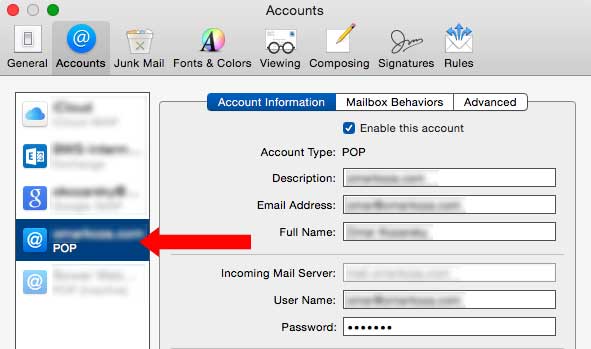
- Click on the Advanced tab. Uncheck the “Automatically detect and maintain account settings” box.
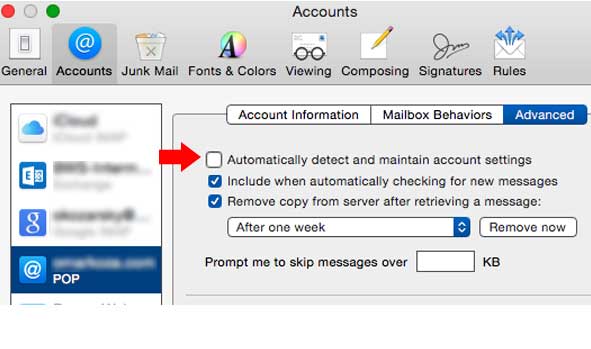
- Close the Account preferences window by clicking on the red “close” button in its top left corner. Click “Save” to save the settings when closing this Preferences box.
- Reopen the Mail Preferences from step #2
- Select the Mail account you wish to edit again and switch back to the “Account Information” tab
- In the “Incoming Mail Server” field enter:
server3.bowerwebsolutions.com
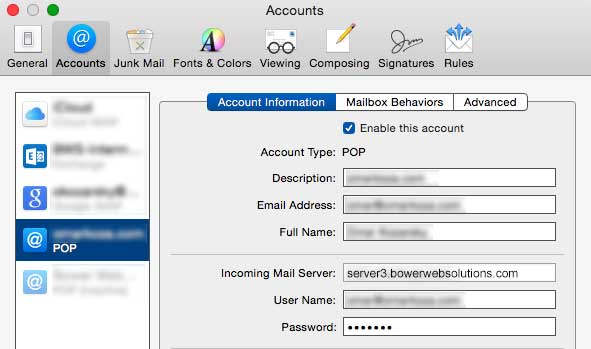
- Switch back to “Advanced” tab.
– Click “Automatically detect and maintain account settings” back ON
– Click “Remove copy from server after retrieving a message” to ON
– Set interval to “After one day”
– Set Port to 995
– Set Authentication to “Password”
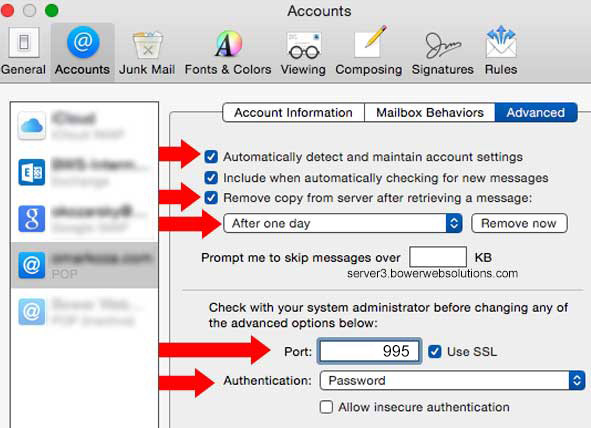
- To send OUT messages securely, switch to “Account Information’ tab. Click on the drop down list for “Outbound Mail Server (SMTP)” and then select “Edit SMTP Server List”. In the “Account Information” tab the Server Name should be: server3.bowerwebsolutions.com.
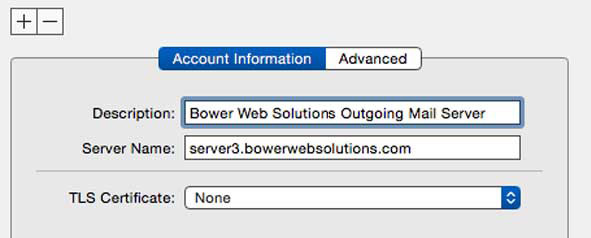
- Click the “Advanced” tab. Change Port to 587. Authentication should be “Password”. The user name should be your complete email address. Enter your password correctly. Click “OK”.
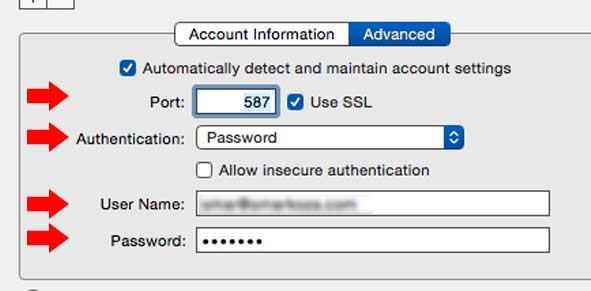
- Close the Account preferences window. Click “Save” to save the changes.
How to Configure Your iPhone, iPod Touch and iPad
 Go to Settings>Mail Contacts and Calendars.
- Click on the account you want to edit.
- Incoming and outgoing mail server should be server3.bowerwebsolutions.com
- Click/tap the arrow after the outgoing mail server SMTP >
and make sure it is server3.bowerwebsolutions.com , that SSL is turned on (green) and the server port is 587 (Click/tap on it to change if you need to). - Click/tap Advanced:
Incoming Settings should have SSL turned on and the Server Port should be 995 (If you followed Bower Web Solutions original tutorial I-device set up tutorial this should be the only changes) - Click Done and back to exit out.
 How to Set up Your Android Device
- From the Home screen, tap the Settings button.
- Tap Accounts
Tap Email
Tap Settings - Tap the email account you need to edit.
- Scroll down and Tap more settings.
- Tap incoming settings.
- POP server—Enter server3.bowerwebsolutions.com
- SSL Security.
- Port— should be 995
- Tap Done. The device will connect to the internet and check your incoming settings. Be patient…this can take awhile.
- Tap outgoing settings.
- SPTP server—Enter server3.bowerwebsolutions.com
- TLS Security.
- Port— should be 587.
Note that previously we had recommend Port 465 with SSL that should also work.
- Tap the Done button. The device will connect to the internet and check your incoming settings. Be patient…this can take awhile.
- On the Outgoing server settings screen, enter the following information in the fields provided:
• SMTP server—Enter server3.bowerwebsolutions.com
• Port—Enter the secure port number: 587
• Security type—Select TLS. - Tap the Next button. The device will connect to the internet and check your outgoing settings.
- Exit out by tapping the back arrow the top right corner.
 How to Check / Fix Web Based Email On Your Domain Using Gmail
- Sign into your GMail account.
Go to settings by clicking on the arrow next to the gear icon and choosing settings.
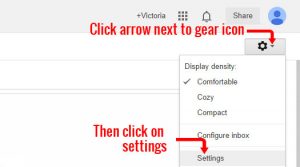
Go to Accounts and Imports (on tabs at top). - Go to “Send mail as” and click on ‘edit info’ next to the email account on your domain (over on the far right).
A pop up window should open up.
If “Treat as an alias” is checked, click cancel and go on to step 3.
If “Treat as an alias” is unchecked click “Next Step”.
If the port is already set to 587 and ‘Secured connection using TLS (recommended)’ is checked you don’t need to change anything. Click “cancel”.
If the port is not 587 change it to 587 and check ‘Secured connection using TLS (recommended).’ Enter the password for the Email On Your Domain. (Not your Gmail password) and change SMTP Server to server3.bowerwebsolutions.com . Click “Save Changes”. - Go to ‘Check mail from other accounts (using POP3): and click on ‘edit info’ next to the the Email On Your Domain.
If “Always use a secure connection (SSL) when retrieving mail. ” is checked and the Port is 995 you don’t need to change anything. Click “Cancel” and go on to step 4. If the above is not correct, change:
Username: YourEmail@YourDomain.com (don’t forget to add your full domain).
Password: (Again, this is the password for the email on your domain, not the Gmail password. We don’t have to tell you to be careful to get your password, do we?)
POP Server: server3.bowerwebsolutions.com Port should be 995.
Check ‘Secured connection using TLS (recommended)’ marked or, if TLS is not an option, check ‘Always use a secure connection (SSL) when retrieving mail’.
Click “Save changes”
- You should be done, but we always recommend testing by sending yourself an email to your email at your domain and then replying to it.

