
Configure Email In Office 365 Outlook and 2019
Applies to:
Difficulty Level:
Medium
Time Needed:
10 minutes
Tools Needed:
Microsoft Office 365 Outlook
Introduction
This tutorial is provided as a courtesy to our hosting customers to help you configure your Microsoft Office 365 Version of Outlook software to work with Bower Web Solutions POP email.
If you have an older version of Outlook our Outlook and Outlook Express tutorial will be more helpful.
While we try our best to assist our customers, assistance with third-party software can not be supported completely by Bower Web Solutions.
IT Professionals and Expert Set Up
If you have doubts about your expertise take the time to use the complete setup instructions below:
- Use manual configuration for POP3 email. Our servers limit storage making IMAP impracticable and autoconfig uses IMAP – we do offer other email options if full synchronization is required. Contact us for more information.
- server3.bowerwebsolutions.com for both incoming and outgoing servers.
- Username is complete email address (including domain).
- Secure Password Authentication (SPA) logon is not required.
- Outgoing server requires authentication.
- Incoming server should be 995 with an encrypted connection required.
- Outgoing server should be 587 with TLS encryption (if available; use auto if TLS is not available; note that SSL/TLS and STARTTLS are different from standard TLS and should not be selected).
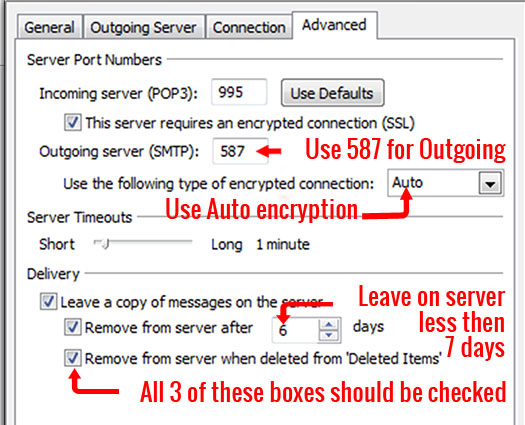
- IMPORTANT: Reduce the time messages are left on the server to slightly longer than the back up period. Check Remove from server when deleted from deleted items and verify that user understands how this works – Details / additional information below.
Requirements
Before you start, be sure you have these pieces of information available:
- Your email address ( example: someone@somewhere.com )
- Your email password (NOTE: passwords are case-sensitive and must be entered exactly
How to Configure Microsoft Outlook in Office 365
Open Microsoft Outlook.
- Open Microsoft Outlook .
If this is the first time you’ve opened Outlook, you will be prompted to create an email account.
If you already have an email account in Outlook: Choose File in the top left corner. Click on the ‘Account settings’ box in the center and then click on the ‘Account Settings: Add or remove accounts or change existing accounts’ box that appears.
If you are presented with an option of ‘Choose email service…’, you have an older version of Outlook and our Outlook and Outlook Express tutorial will be more helpful.
- In the box that appears, Email tab is normally selected. If not, choose email. Click ‘New’.
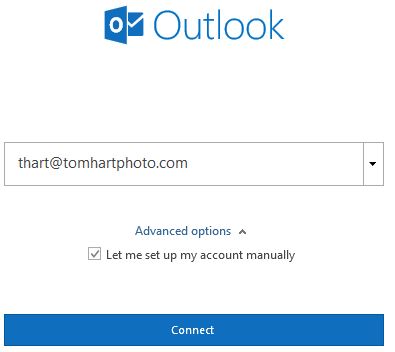
- Enter your full email account and click ‘Advanced options’ then check ‘Let me manually set up my account manually and click connect.
Note that automatically configuring will set up your account incorrectly and cause disk space issues in the future.
You must set up your account manually for it to work properly. - Choose POP
- Enter your Account Settings:
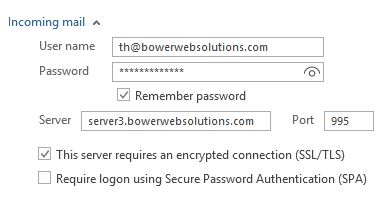
Incoming mail server and outgoing mail server should be server3.bowerwebsolutions.com
Incoming port should be 995.
 Check ‘This server requires an encrypted connections (SSL/TLS)’.
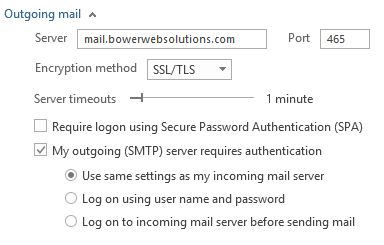
Secure Password Authentication (SPA) logon is not required and should not be checked.
Outgoing mail server should be server3.bowerwebsolutions.com
Outgoing port should be 465.
Encrypted method try auto.
Secure Password Authentication (SPA) logon is not required and should not be checked. 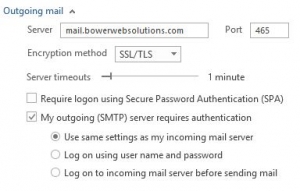 If you already have an email account and want the new emails to be mixed with the old, select and existing outlook data file. If you want to keep them separate (or this is a new set up) then create a new outlook data file.
Click Next and enter password. Passwords are case sensitive and must be exactly right (we know we don’t need to say this, but incorrect passwords are the most common problem). Click next
If you are account doesn’t get set up, check to make sure you can login using webmail). If the email and password are correct and all of the above settings are correct, you can also try changing the outgoing server settings to TLS or SSL. SSL/TLS and STARTTLS are different from standard TLS and should not be selected).- If you have success, you are not done.
- Click on the account you just created.
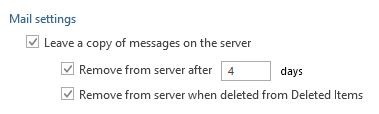
Click on the ‘Outgoing Server‘ tab. (If you clicked out you can get back to these settings by following step 1 again).  Make sure you are not leaving messages on the server (for too long).
Explanation: Once you have downloaded the messages onto your computer they will be saved on your computer. Leaving them on the server takes up resources and risks filling up your email account or even the space allocated for the entire website. By default, Outlook should not leave messages on the server. However, since leaving messages on the server will quickly cause your account on the server to fill up, we highly recommend you take a second to check.
If you check messages from multiple devices you need to leave messages on the server long enough for the other devices to sync.
Uncheck the box “Leave a copy of messages on the server” or if you leave “Leave a copy of messages on the server” checked, change the number next to “Remove from server after” to 1 to 7 days to give your computer time to back up and/or to get the messages onto other computers
AND select the box to remove from server when deleted from deleted messages if checking does not uncheck ‘remove from server after’. Deleting when deleted is nice to have, but pop email will fill up most server accounts quickly if it’s all not removed after several days.
*Note that email accounts often become full from a few huge email attachments such as pictures, videos or documents. By checking ‘remove from server when deleted from deleted message’, you can save large attachment somewhere else on your computer and then delete the email and empty the deleted folder in Outlook to free up the space on the server. Deleting large emails also improves Outlook performance.- Click the OK button>Click the Next button. >Click the Finish button.
- If you are having trouble getting your email to work try using webmail. Logging in to webmail verifies that your email is working properly and allows you to work so you can step away from the problem.
 Recommended: Configure to Automatically empty the Deleted Items folder when you close.
From the main Outlook screen, click the File tab then Click Options.
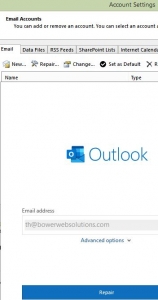
On the Advanced tab, under Outlook Start and Exit, select the Empty the Deleted Items folder upon exiting check box.- To make changes to an account after you’ve got it working you need to select the repair option and then manual repair under advanced options. This roundabout way will take you back to the screenshots you see above.
